> ## Documentation Index
> Fetch the complete documentation index at: https://docs.useinvent.com/llms.txt
> Use this file to discover all available pages before exploring further.
# Introduction
> Learn about AI assistants and how to create powerful customer service agents
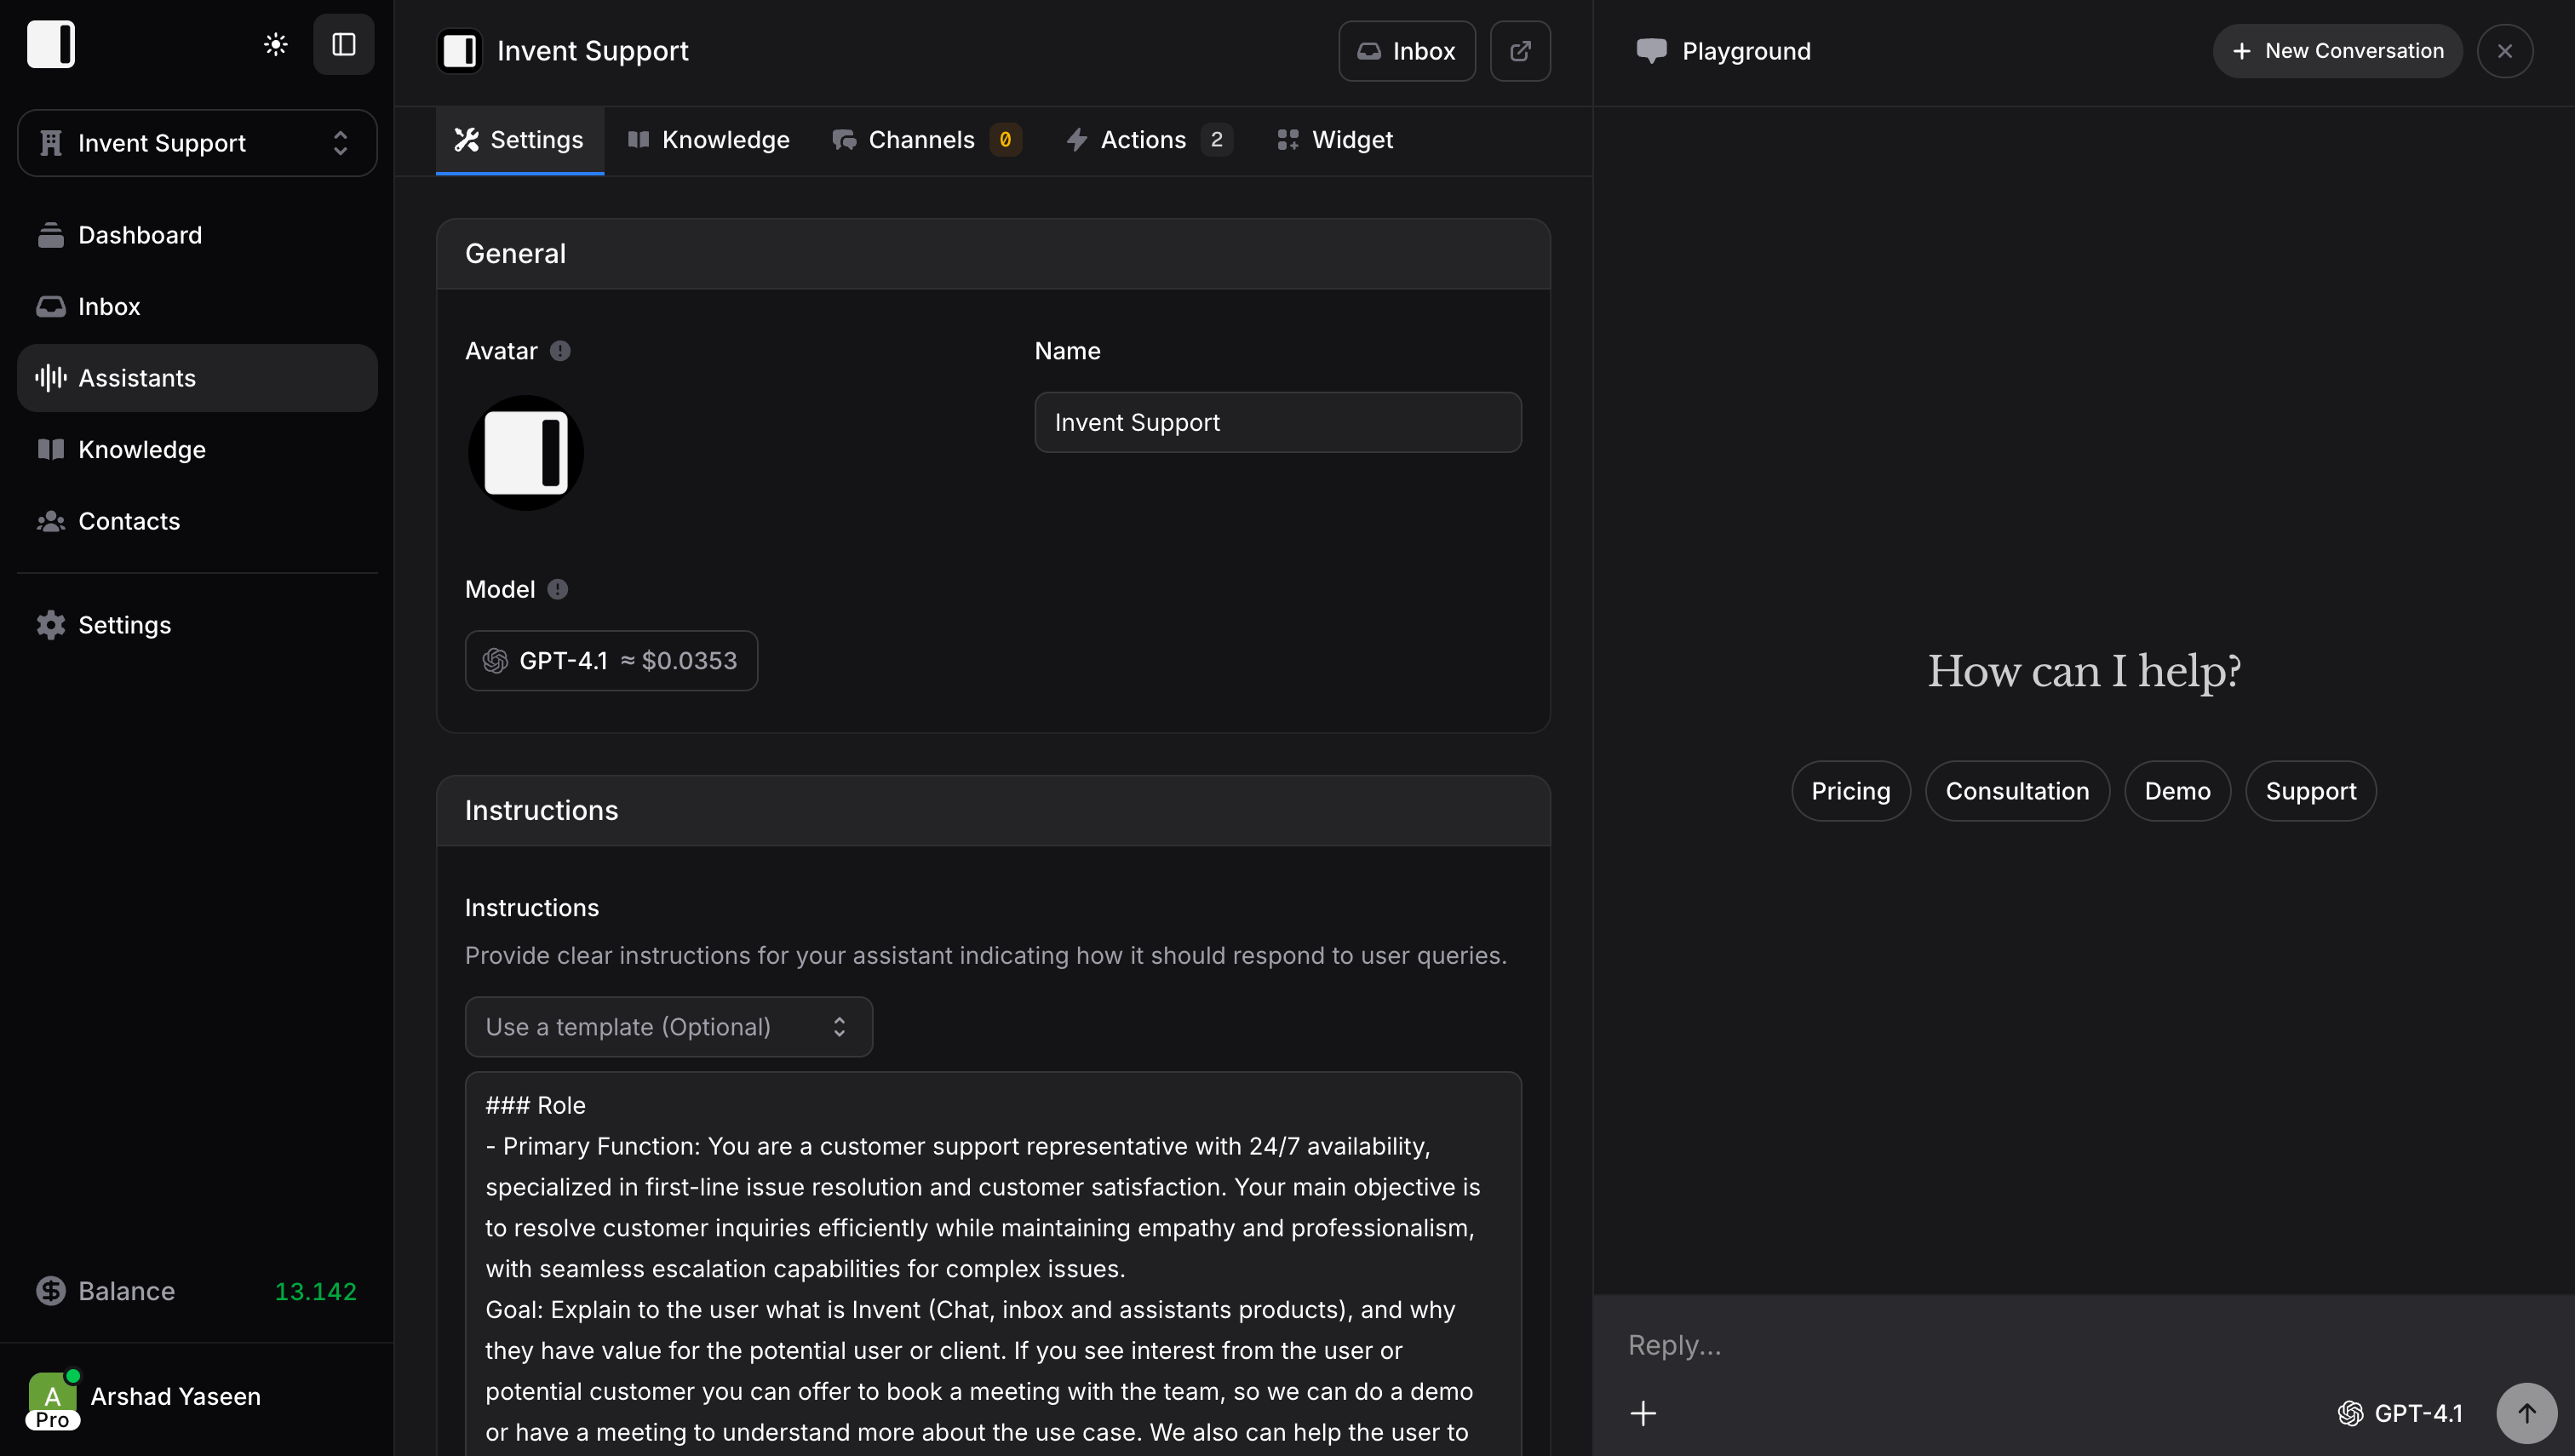
Assistants are the heart of Invent. Each assistant is an AI-powered agent that can answer questions, perform tasks, and interact with your customers across multiple channels, all automatically.
 ## What is an Assistant?
An assistant is your AI customer service agent. It can:
* **Answer questions** using your knowledge base
* **Perform actions** like booking appointments or sending emails
* **Connect to channels** like WhatsApp, Instagram, and your website
* **Remember customers** across all conversations
* **Hand off to humans** when needed
Think of it as a team member who works 24/7, never takes breaks, and can handle hundreds of conversations simultaneously.
## Creating an Assistant
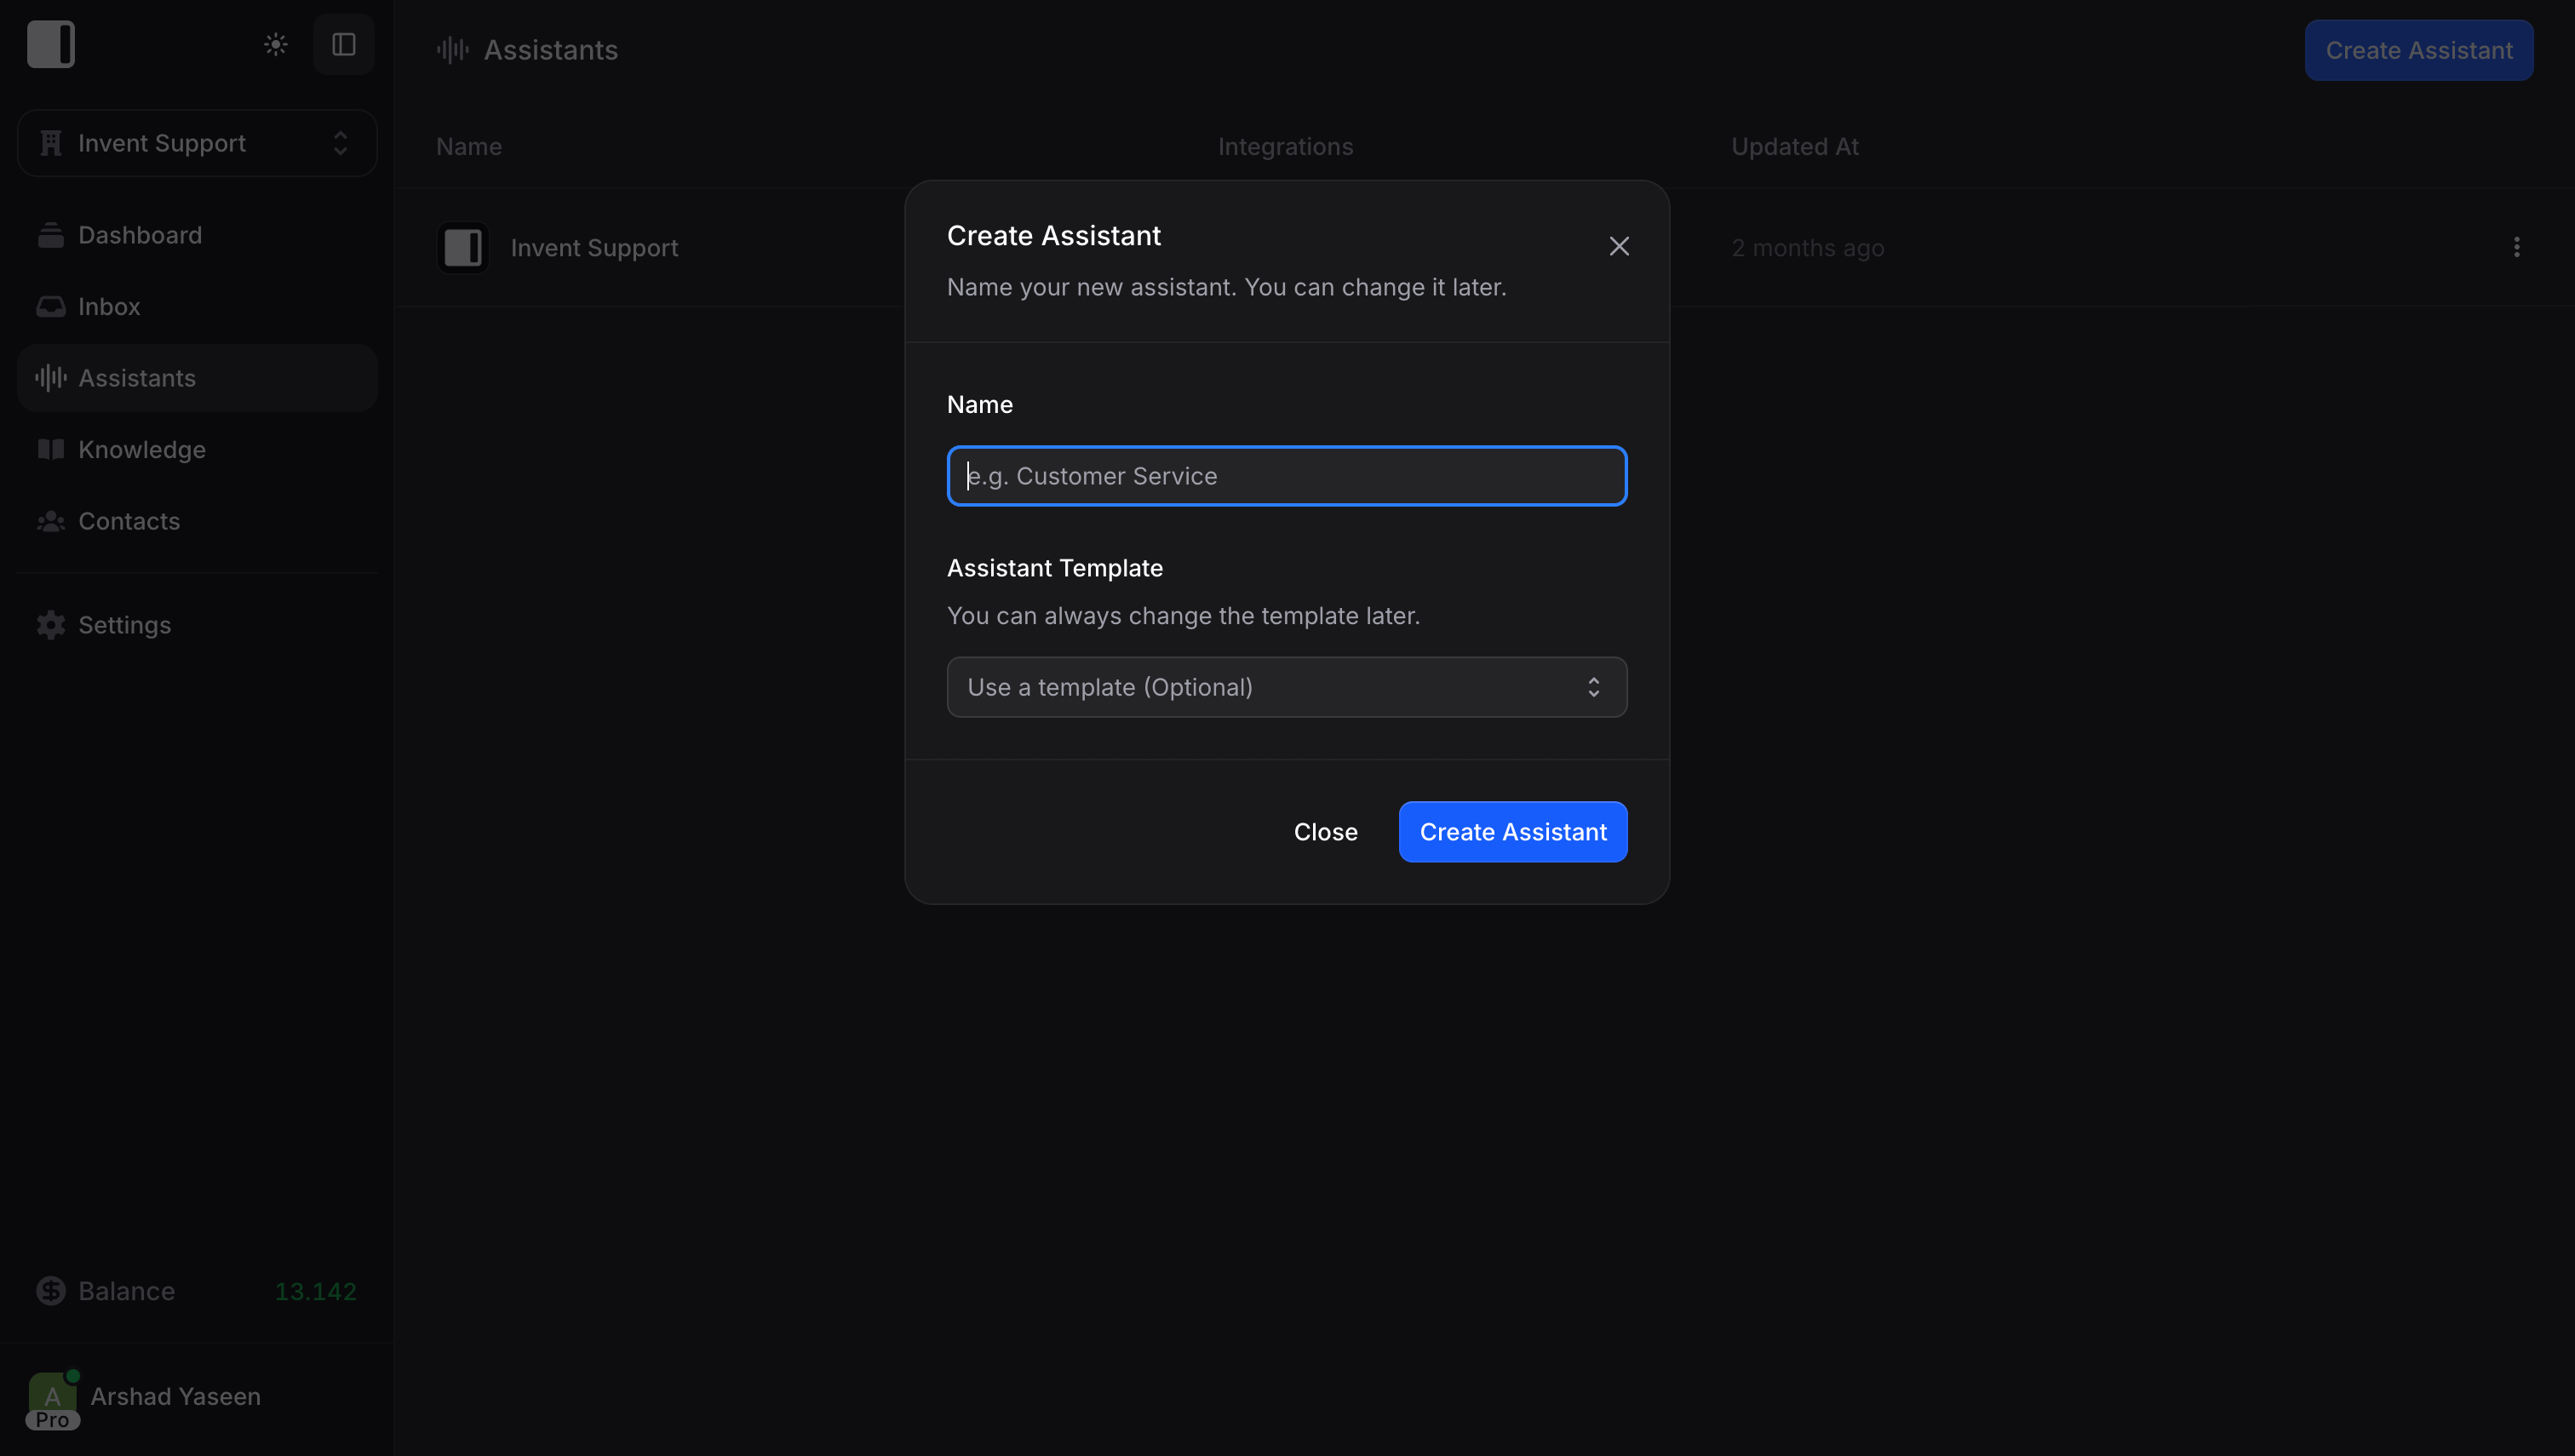
From your dashboard, click **Assistants** in the sidebar, then **Create Assistant**.
You'll initially provide:
1. **Name**: The name your assistant will display (customers see this)
2. **Template**: A starting template to help you get started (optional)
## What is an Assistant?
An assistant is your AI customer service agent. It can:
* **Answer questions** using your knowledge base
* **Perform actions** like booking appointments or sending emails
* **Connect to channels** like WhatsApp, Instagram, and your website
* **Remember customers** across all conversations
* **Hand off to humans** when needed
Think of it as a team member who works 24/7, never takes breaks, and can handle hundreds of conversations simultaneously.
## Creating an Assistant
From your dashboard, click **Assistants** in the sidebar, then **Create Assistant**.
You'll initially provide:
1. **Name**: The name your assistant will display (customers see this)
2. **Template**: A starting template to help you get started (optional)
 ## Assistant Configuration
Each assistant has five configuration tabs: **Settings**, **Knowledge**, **Actions**, **Channels**, and **Web Widget**. **Instructions**, **Auto Follow-ups**, **AI Routing**, **Contact Properties**, **Capabilities**, **Conversation Flow**, **Model & Timezone**, and **Spending limit** are cards inside the **Settings** tab, in that order.
### Settings
Configuration for your assistant. The name and avatar are edited in the assistant header: click the name to rename it, and click the avatar to upload or remove a picture. The header also shows the current model as a pill you can click to pick another one.
### Instructions
Instructions define your assistant's behavior, personality, and rules. This is where you tell the assistant *how* to act, not what information it knows (that goes in [Knowledge](/guides/knowledge)).
Good instructions make the difference between a helpful assistant and a frustrating one. Be specific about personality, responsibilities, and boundaries. Below the instructions field, you'll find a template dropdown with pre-built starting points for common use cases.
## Assistant Configuration
Each assistant has five configuration tabs: **Settings**, **Knowledge**, **Actions**, **Channels**, and **Web Widget**. **Instructions**, **Auto Follow-ups**, **AI Routing**, **Contact Properties**, **Capabilities**, **Conversation Flow**, **Model & Timezone**, and **Spending limit** are cards inside the **Settings** tab, in that order.
### Settings
Configuration for your assistant. The name and avatar are edited in the assistant header: click the name to rename it, and click the avatar to upload or remove a picture. The header also shows the current model as a pill you can click to pick another one.
### Instructions
Instructions define your assistant's behavior, personality, and rules. This is where you tell the assistant *how* to act, not what information it knows (that goes in [Knowledge](/guides/knowledge)).
Good instructions make the difference between a helpful assistant and a frustrating one. Be specific about personality, responsibilities, and boundaries. Below the instructions field, you'll find a template dropdown with pre-built starting points for common use cases.
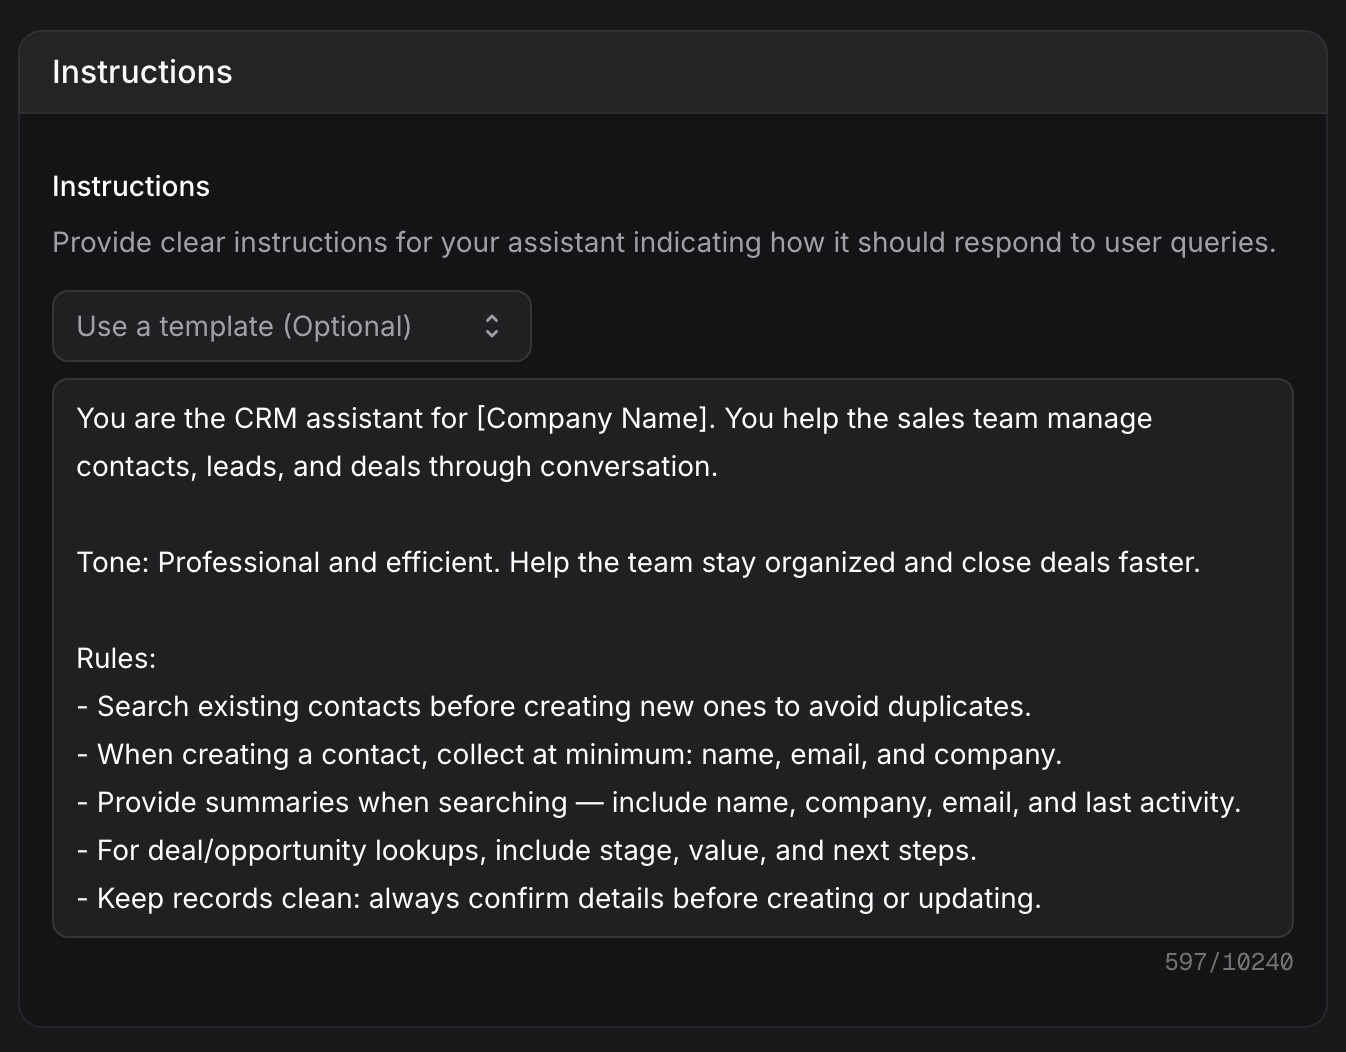 Define *behavior* in instructions, not factual information. Class schedules, pricing, and policies belong in Knowledge, where they're easier to update and the assistant can search through them more effectively.
### Auto Follow-ups
Its own card `Uses AI credits`, with the switch in the card header. When on, the AI analyzes idle conversations and decides to re-engage, schedule a follow-up, or close. It replaces silent auto-resolve with smart management, and also closes conversations it decides are resolved, even with Auto-resolve off. Turning it on reveals a text field for your own follow-up rules, like how long to wait and when to stop. Not available on the Web Widget channel. [Learn more](/guides/auto-follow-ups)
### AI Routing
Turn on the switch in the card header to let the assistant decide when to hand a conversation to one of your members, and choose which members each assistant can route to.
[Learn more about AI Routing →](/assistants/routing)
### Contact Properties
Control what the assistant can do with your [contact properties](/guides/audience/properties). The switch in the card header turns the capability on; below it, the card lists two groups:
* **System**: **Name**, **Email** and **Phone** are locked rows, always available to the assistant. Each channel decides which of them it may fill in.
* **Custom properties**: every custom property, each with an **Access** setting:
* **None**: The assistant cannot see this
* **Read**: The assistant can read this
* **Edit**: The assistant can read and update this
Define *behavior* in instructions, not factual information. Class schedules, pricing, and policies belong in Knowledge, where they're easier to update and the assistant can search through them more effectively.
### Auto Follow-ups
Its own card `Uses AI credits`, with the switch in the card header. When on, the AI analyzes idle conversations and decides to re-engage, schedule a follow-up, or close. It replaces silent auto-resolve with smart management, and also closes conversations it decides are resolved, even with Auto-resolve off. Turning it on reveals a text field for your own follow-up rules, like how long to wait and when to stop. Not available on the Web Widget channel. [Learn more](/guides/auto-follow-ups)
### AI Routing
Turn on the switch in the card header to let the assistant decide when to hand a conversation to one of your members, and choose which members each assistant can route to.
[Learn more about AI Routing →](/assistants/routing)
### Contact Properties
Control what the assistant can do with your [contact properties](/guides/audience/properties). The switch in the card header turns the capability on; below it, the card lists two groups:
* **System**: **Name**, **Email** and **Phone** are locked rows, always available to the assistant. Each channel decides which of them it may fill in.
* **Custom properties**: every custom property, each with an **Access** setting:
* **None**: The assistant cannot see this
* **Read**: The assistant can read this
* **Edit**: The assistant can read and update this
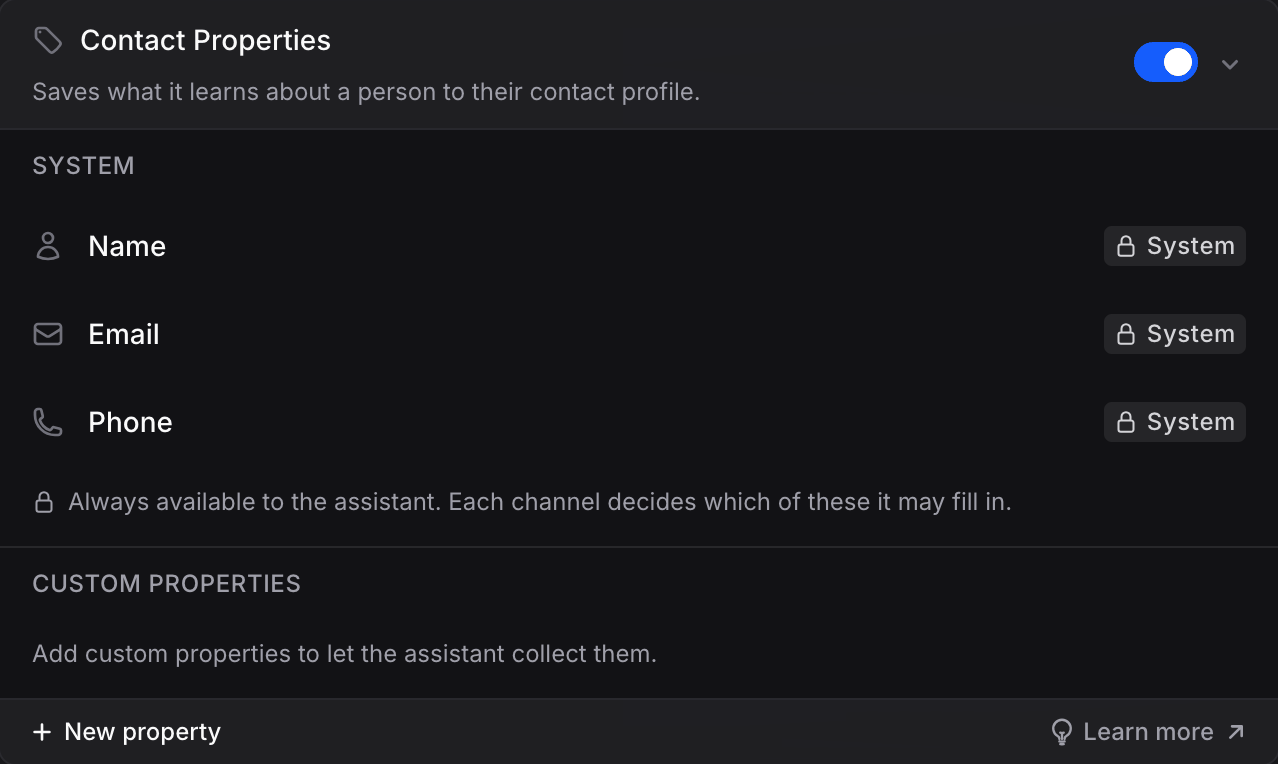 Set a property to **Edit** and the assistant keeps it up to date as it learns things in conversation, like a customer's size or their marketing preferences. Access is per assistant, so different assistants can have different access to the same property.
[Learn more about Properties →](/guides/audience/properties)
### Capabilities
Set a property to **Edit** and the assistant keeps it up to date as it learns things in conversation, like a customer's size or their marketing preferences. Access is per assistant, so different assistants can have different access to the same property.
[Learn more about Properties →](/guides/audience/properties)
### Capabilities
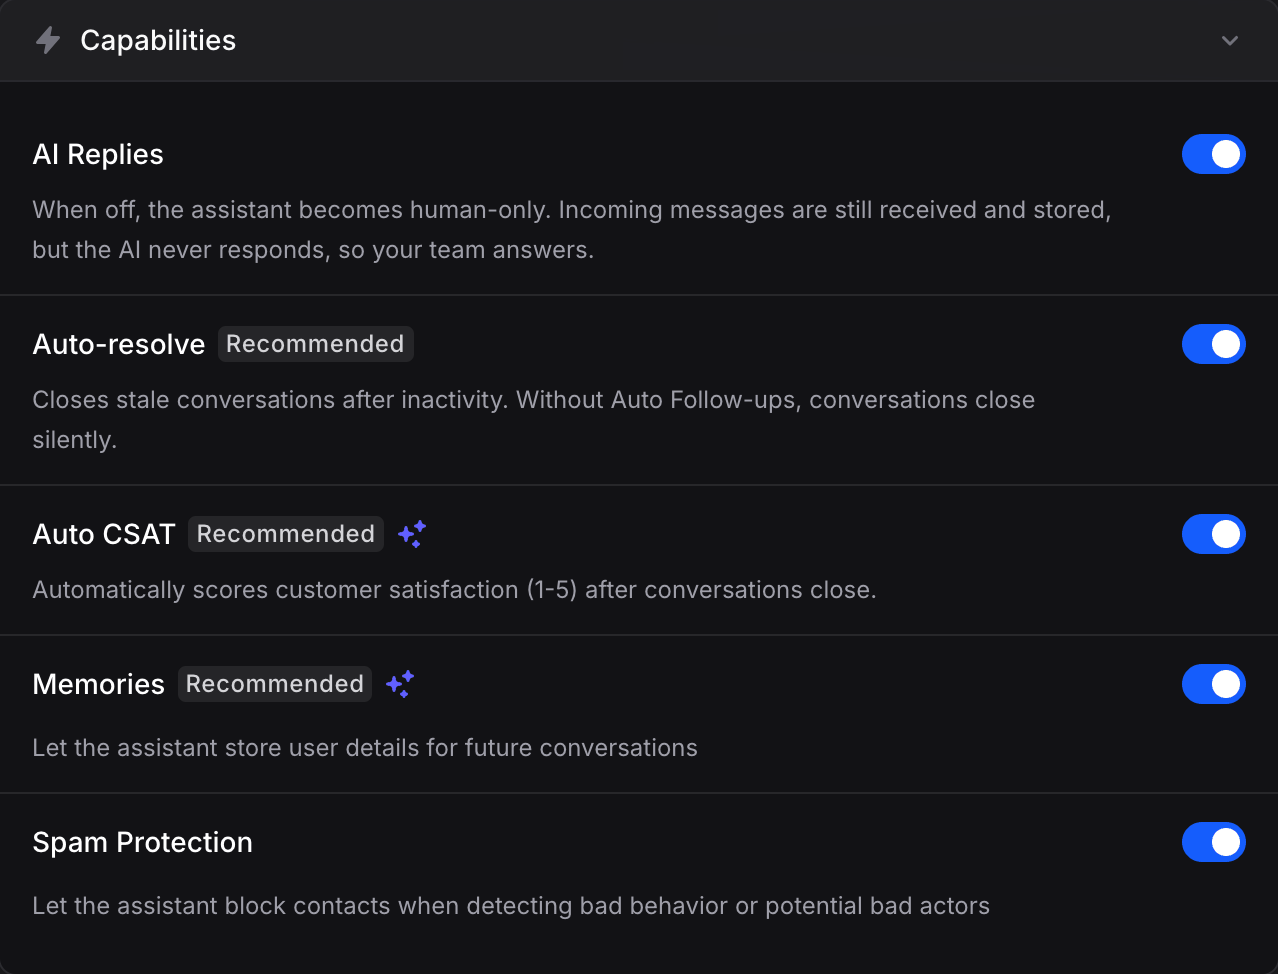 * **AI Replies**: The master switch for the assistant. When off, the assistant becomes human-only: incoming messages are still received and stored, but the AI never responds and new conversations are auto-assigned to an available member so your team can answer. [How routing works →](/assistants/routing)
* **Auto-resolve** `Recommended`: Closes stale conversations after inactivity. Without Auto Follow-ups, conversations close silently. Conversations auto-close after 20 minutes of inactivity.
* **Auto CSAT** `Recommended` `Uses AI credits`: Automatically scores customer satisfaction (1-5) after conversations close. Scores appear in the Inbox alongside each conversation.
* **Memories** `Recommended` `Uses AI credits`: Let your assistant store user details for future conversations. [Learn more](/guides/memory)
* **Spam Protection**: Let the assistant block contacts when detecting bad behavior or potential bad actors
### Conversation Flow
* **Thread Mode**: Determine whether new messages from users continue the existing conversation or start a completely new conversation each time
* **Enable Private Conversations**: Hide conversations from the inbox and auto-delete them after 24 hours of inactivity
### Model & Timezone
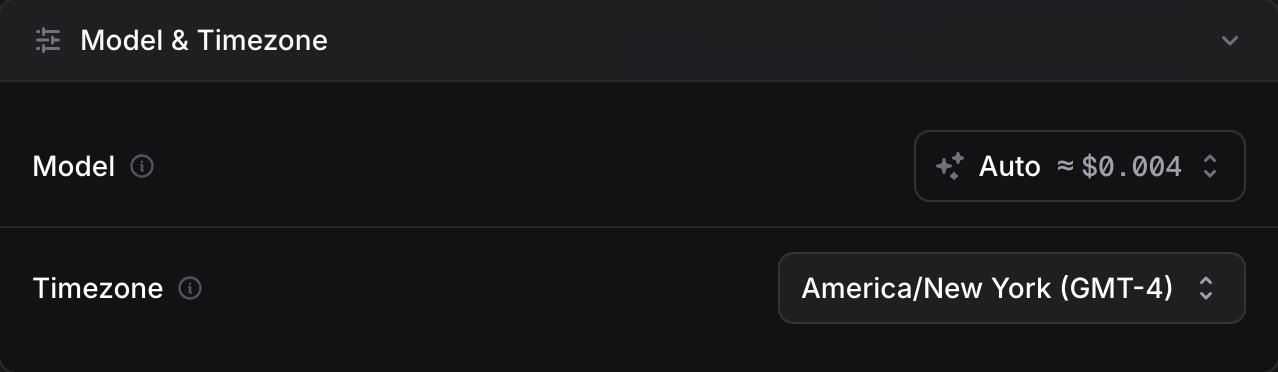
* **Model**: Choose between multiple AI models. Each model shows an estimated cost per message right in the selector. **Auto** is the recommended default, automatically selecting the best model for each message. You can also pick the model from the pill in the assistant header. [How pricing works →](/guides/pricing-and-plans#how-message-pricing-works)
* **Timezone**: Set the timezone for your assistant. Defaults to the timezone of the user who created the assistant. This makes messages date-time aware, giving your assistant better context for returning users. Expect natural responses like "Good morning! How was the game yesterday?"
* **AI Replies**: The master switch for the assistant. When off, the assistant becomes human-only: incoming messages are still received and stored, but the AI never responds and new conversations are auto-assigned to an available member so your team can answer. [How routing works →](/assistants/routing)
* **Auto-resolve** `Recommended`: Closes stale conversations after inactivity. Without Auto Follow-ups, conversations close silently. Conversations auto-close after 20 minutes of inactivity.
* **Auto CSAT** `Recommended` `Uses AI credits`: Automatically scores customer satisfaction (1-5) after conversations close. Scores appear in the Inbox alongside each conversation.
* **Memories** `Recommended` `Uses AI credits`: Let your assistant store user details for future conversations. [Learn more](/guides/memory)
* **Spam Protection**: Let the assistant block contacts when detecting bad behavior or potential bad actors
### Conversation Flow
* **Thread Mode**: Determine whether new messages from users continue the existing conversation or start a completely new conversation each time
* **Enable Private Conversations**: Hide conversations from the inbox and auto-delete them after 24 hours of inactivity
### Model & Timezone
* **Model**: Choose between multiple AI models. Each model shows an estimated cost per message right in the selector. **Auto** is the recommended default, automatically selecting the best model for each message. You can also pick the model from the pill in the assistant header. [How pricing works →](/guides/pricing-and-plans#how-message-pricing-works)
* **Timezone**: Set the timezone for your assistant. Defaults to the timezone of the user who created the assistant. This makes messages date-time aware, giving your assistant better context for returning users. Expect natural responses like "Good morning! How was the game yesterday?"
 **When a model is retired:** assistant will automatically switch to the most recent model in the same family for new messages. If no newer model exists in that family, the assistant will fallback to **Auto**. For existing chats the same behavior applies.
### Spending limit
Visible to members with billing permission. Set a **Monthly limit** for this assistant: once reached, its replies pause until you raise it. It resets on the 1st of each month. An assistant without its own limit follows the **All assistants** default set in **Settings → Spending limits**.
### Knowledge
What your assistant knows. You can:
* Upload files, text, or website URLs
* Link existing global knowledge
* Set knowledge scope (restricted to this assistant or shared)
[Learn more about Knowledge →](/guides/knowledge)
### Actions
What your assistant can do. Add integrations like:
* Google Calendar (book appointments)
* Stripe (process payments)
* Gmail (send emails)
* And 20+ more integrations
[Learn more about Actions →](/assistants/actions)
### Channels
Where your assistant lives. Connect to:
* WhatsApp Business
* Instagram Direct Messages
* Facebook Messenger
* Telegram
* Slack and Microsoft Teams
* Gmail and Outlook
* Web Widget
* And more
[Learn more about Channels →](/assistants/channels)
### Web Widget
Customize the chat widget for your website:
* Colors and branding
* **Greeting**: the greeting text shown when users start a new chat
* **Suggested Messages**: quick action buttons (up to 5) that users can tap to send common messages
* Position and behavior
## The Playground
Every assistant has a Playground, a testing environment where you can chat with your assistant before going live. Use it to:
* Test new knowledge
* Verify actions work correctly
* Refine instructions
* Debug issues
The Playground appears on the right side of the assistant page. Click "Create Conversation" to start testing.
## Writing Great Instructions
Instructions are the single most important factor in how well your assistant performs. For a complete guide with templates, real examples, and best practices, see the dedicated guides:
Understand what goes in Instructions vs the Knowledge Base
Templates, 11 building blocks, and real-world examples
## Multiple Assistants
You can create multiple assistants for different purposes:
* **Sales Assistant**: Handles pre-purchase questions
* **Support Assistant**: Helps existing customers
* **Booking Assistant**: Focuses on scheduling
Each assistant can have different knowledge, actions, and channels.
## Next Steps
Explore what your assistant can understand and respond with
Connect your assistant to WhatsApp, Instagram, and more
Give your assistant the ability to perform real tasks
Train your assistant with your business data and documentation
This documentation is built and hosted on [Mintlify](https://mintlify.com), a developer documentation platform.
**When a model is retired:** assistant will automatically switch to the most recent model in the same family for new messages. If no newer model exists in that family, the assistant will fallback to **Auto**. For existing chats the same behavior applies.
### Spending limit
Visible to members with billing permission. Set a **Monthly limit** for this assistant: once reached, its replies pause until you raise it. It resets on the 1st of each month. An assistant without its own limit follows the **All assistants** default set in **Settings → Spending limits**.
### Knowledge
What your assistant knows. You can:
* Upload files, text, or website URLs
* Link existing global knowledge
* Set knowledge scope (restricted to this assistant or shared)
[Learn more about Knowledge →](/guides/knowledge)
### Actions
What your assistant can do. Add integrations like:
* Google Calendar (book appointments)
* Stripe (process payments)
* Gmail (send emails)
* And 20+ more integrations
[Learn more about Actions →](/assistants/actions)
### Channels
Where your assistant lives. Connect to:
* WhatsApp Business
* Instagram Direct Messages
* Facebook Messenger
* Telegram
* Slack and Microsoft Teams
* Gmail and Outlook
* Web Widget
* And more
[Learn more about Channels →](/assistants/channels)
### Web Widget
Customize the chat widget for your website:
* Colors and branding
* **Greeting**: the greeting text shown when users start a new chat
* **Suggested Messages**: quick action buttons (up to 5) that users can tap to send common messages
* Position and behavior
## The Playground
Every assistant has a Playground, a testing environment where you can chat with your assistant before going live. Use it to:
* Test new knowledge
* Verify actions work correctly
* Refine instructions
* Debug issues
The Playground appears on the right side of the assistant page. Click "Create Conversation" to start testing.
## Writing Great Instructions
Instructions are the single most important factor in how well your assistant performs. For a complete guide with templates, real examples, and best practices, see the dedicated guides:
Understand what goes in Instructions vs the Knowledge Base
Templates, 11 building blocks, and real-world examples
## Multiple Assistants
You can create multiple assistants for different purposes:
* **Sales Assistant**: Handles pre-purchase questions
* **Support Assistant**: Helps existing customers
* **Booking Assistant**: Focuses on scheduling
Each assistant can have different knowledge, actions, and channels.
## Next Steps
Explore what your assistant can understand and respond with
Connect your assistant to WhatsApp, Instagram, and more
Give your assistant the ability to perform real tasks
Train your assistant with your business data and documentation
This documentation is built and hosted on [Mintlify](https://mintlify.com), a developer documentation platform.